Flow Editor
The flow detail page — screens and elements, logic jumps, settings, sharing, responses, and pushing a flow live to WhatsApp.
Opening a flow from the Flows list opens its detail page: six tabs over one flow, with Save to WhatsApp always in reach.
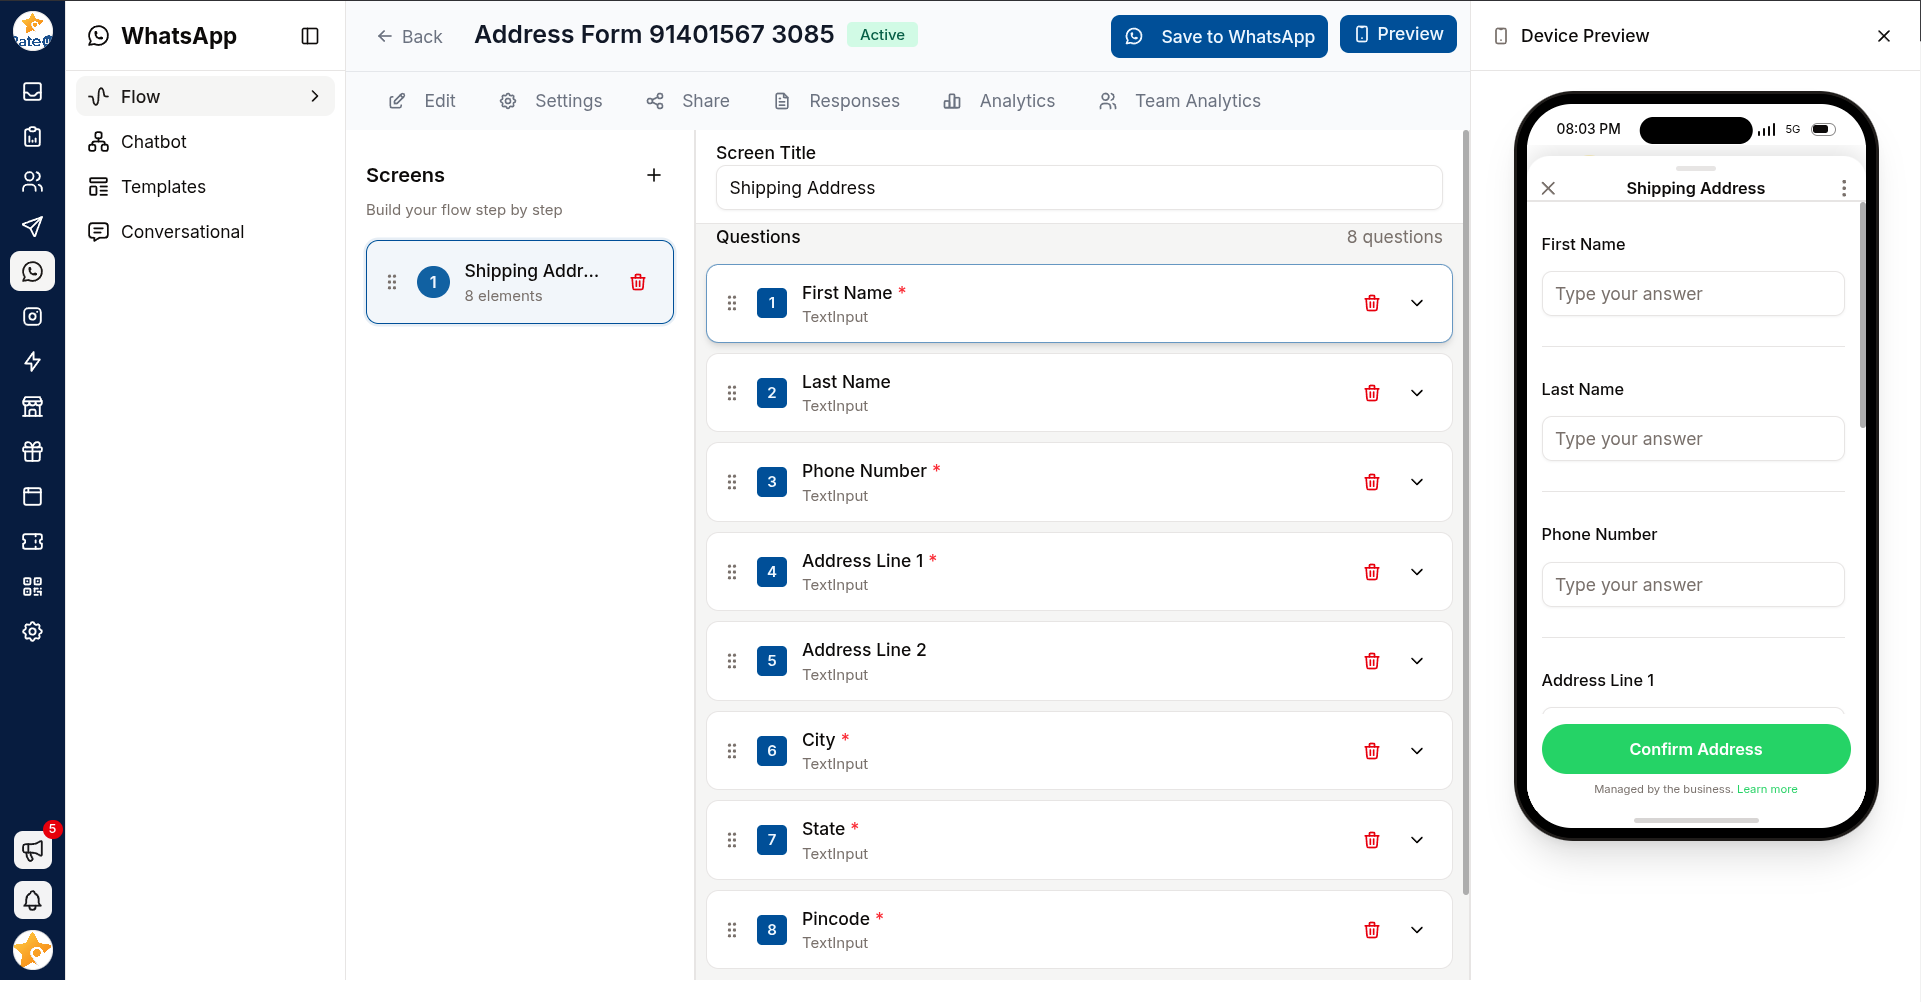
The Header
| Control | Does |
|---|---|
| Back | Returns to the flows list |
| Flow name and Active badge | Which flow you are in |
| Save to WhatsApp | Pushes the current version to Meta — shows "Syncing…" while it works |
| Preview | Opens Device Preview — the flow in a phone frame, beside the editor (Edit tab only) |
| Tab | For |
|---|---|
| Edit | Screens and the elements on them |
| Settings | Name, teams, webhooks |
| Share | How the flow reaches customers |
| Responses | Individual submissions |
| Analytics | Charts across all submissions |
| Team Analytics | The same results compared between teams |
Edit: Screens and Elements
The Edit tab is two columns: Screens on the left — "Build your flow step by step" — and the selected screen's Questions on the right, with its Screen Title at the top and the element count on the right of the list.
Click + (Add Screen) in the Screens header, give it a Screen Title — it is required — and click Create Screen.
With the screen selected, click Add Element and pick a type.
Expand the element with its chevron to edit it in place: its label, its options, whether it is required. A required element shows a red asterisk in the list, and each row names its type underneath.
Reorder with the grip handle at the left of a row, or remove one with the bin.
Repeat per screen. The last element on a screen is usually a Footer, which is the button that moves the customer on.
There is no Save button on this tab. Edits are written about a second after you stop making them — but that saves them in RateUp only. Customers keep getting the old version until you click Save to WhatsApp.
Deleting asks first: Delete Screen? and Delete Element?. With no screen selected the right column reads "Select a screen to view elements".
Element types
| Group | Types |
|---|---|
| Text | Text Heading · Text Subheading · Text Body · Text Caption · RichText |
| Input | Text Input · Text Area · DatePicker · Document Picker · Photo Picker |
| Choice | Single Select · Multiple Select · Dropdown Single Select · Chips Selector · Opt In |
| Scales | Rating · Smiley · Opinion Scale · Like or Dislike · Yes or No |
| Media & links | Image · Image Carousel · Embedded Link |
| Navigation | Footer — the screen's continue button, labelled Continue by default |
Logic Jumps
Logic jumps make a flow react to what the customer answered, instead of marching everyone through every screen.
| Kind | Does |
|---|---|
| Screen Jump | Sends the customer to a different screen when a condition matches |
| Component Jump | "Show or hide components based on conditions" — changes what is on the screen |
Open Add Logic Jump on the element you want to branch from.
Build the condition: the Question, an Operator, and the Response or Value to compare against. Add Condition for more than one.
Set JUMP TO — a screen, or Next Screen (default) to fall through.
Click Save. You will see "Logic jumps saved successfully".
If an element cannot branch, the editor says "No questions available for logic jumps" — add a question element first.
Settings
Three cards, each with its own Save Changes:
| Card | Contains |
|---|---|
| General Settings | Flow Name (required) and the Anonymous switch |
| Team & Notifications | Select Teams for the flow, and Send weekly report to email |
| Webhooks | An endpoint — https://example.com/webhook — that receives every submission |
The webhook uses the same signed, retried delivery as web forms. For the payload, headers and how to verify a signature, see Web Forms → Settings.
Share
How the flow gets in front of people.
| Section | Contains |
|---|---|
| Share Survey | Select Team, an optional Select Tag, and a Share Link |
| "How would you like to survey people?" | The route customers arrive by |
| Edit Start Message | The message that offers the flow, with a live Preview |
| Edit Template Message | The same for a template send — including a header image via Upload Image / Change Image |
Responses, Analytics & Team Analytics
Submissions land against the customer's conversation, so an agent sees them in the thread. These three tabs are the aggregate view: individual responses, charts and AI summaries, and a team-by-team comparison — the same components the web-form results use.
Older Flows Open a Different Editor
Flows created before the current builder open the previous editor: the screens list with a detailed
view per element and a side preview panel. You can tell which you are in from the address —
/whatsapp/flows/v1/… for the old one, /whatsapp/flows/v2/… for the current one.
Both push to WhatsApp the same way.
Troubleshooting
| Symptom | Cause | Fix |
|---|---|---|
| Customers see the old version | Edits saved in RateUp but never pushed | Save to WhatsApp |
| "Screen title is required" | Empty title on a new screen | Name the screen |
| "Please select a screen first" | Adding an element with no screen selected | Select a screen on the left |
| A logic jump never fires | The condition cannot match the answer type | Re-check operator and value |
| Nothing in Responses | Nobody has submitted, or the flow was never pushed live | Push it, then test it yourself |
Related Pages
- Flows — creating one, and how a flow is sent
- Chatbot Builder — opening a flow from a bot step
- Templates — attaching a flow to a template button
- Web Forms → Settings — the webhook contract